


How to Make an Origami Shirt: Easy Step-by-Step Guide
Difficulty:
★★★★★
⏱5-10 mins
📄Specialized Origami Craft Paper

🎬Video Tutorial
📐Step-by-Step Diagram
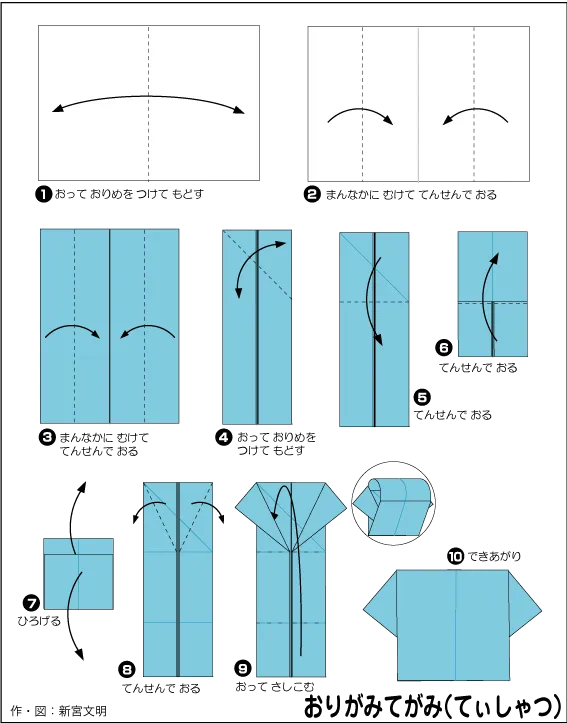
📝 Folding Steps
- Step 1: Start with a rectangular sheet of paper. Fold the paper in half lengthwise, then unfold to create a center crease.
- Step 2: Fold the left and right edges of the paper towards the center, aligning them with the crease you just made.
- Step 3: Continue by folding the outer edges (which are the edges folded in Step 2) inward once more.
- Step 4: Flip the paper over if necessary (or view from the front). Fold the top right corner diagonally inward, so the folded edge aligns with the right-side crease. This forms part of the collar.
- Step 5: Fold the top left corner diagonally inward, symmetrically to the right corner from the previous step, creating a V-shape for the collar.
- Step 6: Fold the top edge of the paper downwards, just above the intersection point of the two collar folds.
- Step 7: To create the sleeves: On the lower part of one side, carefully pull out a small layer of paper and flatten it outwards, forming a sleeve shape. Repeat for the other side.
- Step 8: Unfold the outer edges of the paper (the folds from Step 3 and 7), flattening them to shape the shirt body and the sleeves.
- Step 9: Fold the central strip of paper (just below the collar) downwards to form the front placket of the shirt.
- Step 10: Complete! You now have an Origami paper shirt.


