


How to Make an Origami Shirt: Easy Step-by-Step Guide
Difficulty:
★★★★★
⏱5-10 mins
📄Specialized Origami Craft Paper

🎬Video Tutorial
📐Step-by-Step Diagram
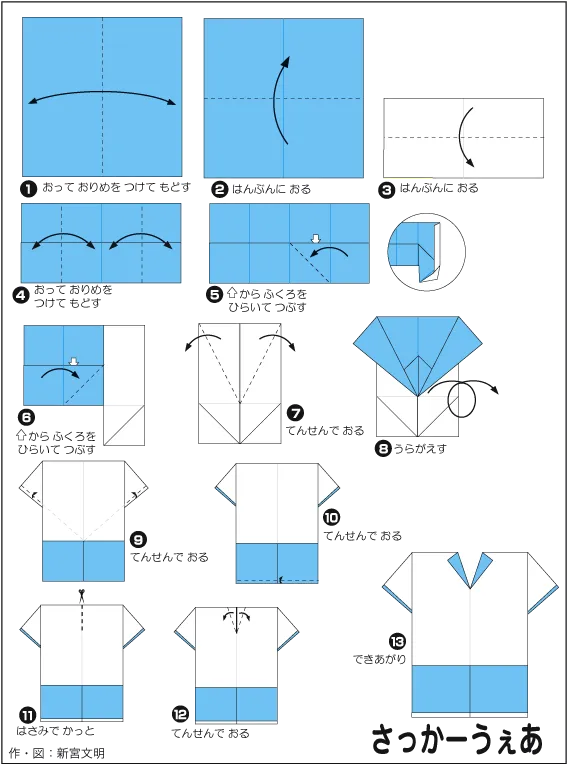
📝 Folding Steps
- Step 1: Place your square paper with the colored side (e.g., blue) facing up. Fold the paper in half vertically, then unfold to create a central crease.
- Step 2: Fold the paper in half horizontally.
- Step 3: Fold the top edge of the paper down to meet the center crease.
- Step 4: Fold both side edges towards the center crease, then unfold. This creates additional vertical creases, dividing the paper into 8 equal sections.
- Step 5: Fold the top right corner inwards along the nearest vertical crease, forming a small triangle.
- Step 6: Similarly, fold the top left corner inwards.
- Step 7: Fold the entire top section down diagonally to form the initial shape of the collar.
- Step 8: Shape the collar by making a small reverse fold along the bottom edge of the collar.
- Step 9: Fold both side edges (which will become the sleeves) diagonally upwards and outwards.
- Step 10: Fold the bottom edge of the shirt up a small amount.
- Step 11: Make a small fold down at the top of the collar to create a V-neckline.
- Step 12: Perform a small inward reverse fold in the middle of the collar to complete the collar's shape.
- Step 13: Your origami shirt is complete!


