


How to Make an Origami T-Shirt: Easy Step-by-Step Guide
Difficulty:
★★★★★
⏱5-10 mins
📄Specialized Origami Craft Paper

🎬Video Tutorial
📐Step-by-Step Diagram
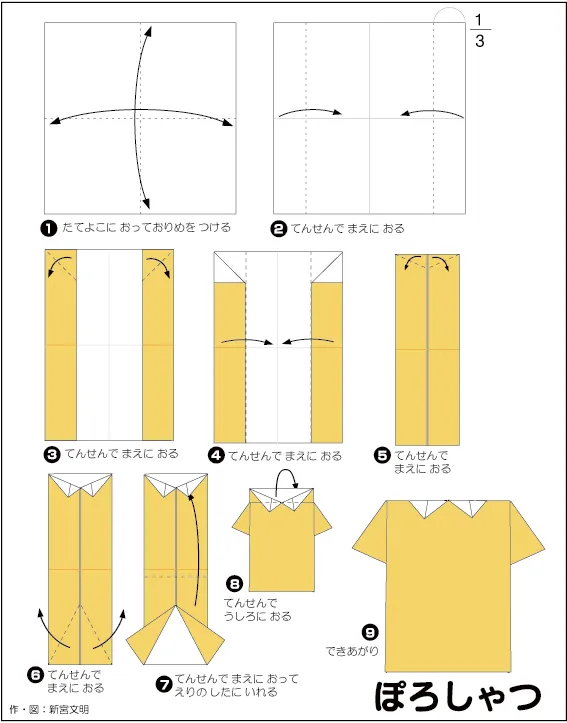
📝 Folding Steps
- Step 1: Fold the paper in half vertically and horizontally, then unfold to create central creases.
- Step 2: Fold both side edges inward along the dotted lines, dividing the paper's width into three equal sections.
- Step 3: At the top section, fold the two outer corners diagonally inward and downward along the dotted lines to shape the collar.
- Step 4: Unfold and extend the two vertical edges on both sides outward along the dotted lines to form the sleeves.
- Step 5: Fold the two sleeve sections created in Step 4 back inward along the dotted lines, returning the paper to its narrow shape.
- Step 6: Rotate the paper 180 degrees (so the collar faces upward). At the bottom, fold the two outer corners diagonally inward along the dotted lines to shape the bottom hem of the shirt.
- Step 7: Lift the two flaps folded in Step 6, then tuck them underneath the collar section (created in Steps 3 and 5) along the dotted lines.
- Step 8: Fold the top part of the collar (the top edge of the paper) downward and to the back along the dotted lines to form the lapel of the polo shirt.
- Step 9: Complete! You now have an origami polo shirt.


