

How to Make an Origami Letter: Easy Step-by-Step Paper Folding
Difficulty:
★★★★★
⏱5-10 mins
📄Specialized Origami Craft Paper

🎬Video Tutorial
📐Step-by-Step Diagram
📌 Pin Diagram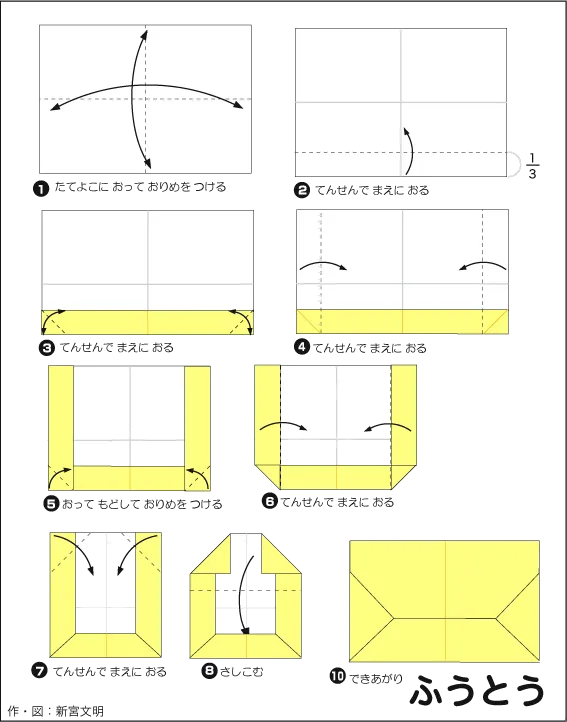
📝 Folding Steps
- Step 1: Prepare your paper. Use a square sheet of origami paper. Choose a color that suits your design. Place the colored side facing up before you begin.
- Step 2: Create base creases. Start by folding the paper in half diagonally or horizontally (depending on the diagram) to create a center crease, then unfold it. Press firmly to ensure the creases are sharp and precise.
- Step 3: Follow the diagram. Refer to the dashed lines in the diagram (valley folds and mountain folds) to fold the corners and edges inward or backward. Ensure the edges are perfectly aligned.
- Step 4: Shape and finish. Adjust the final corners and edges, gently pulling out any hidden folds to add volume or shape to your model. Give all the creases one final firm press to complete your origami letter.
Recommended Origami Supplies
🛒 Shop Origami Paper on AmazonAuthentic Japanese Kami & Washi Origami Paper
Get crisp, accurate creases and vibrant dual-sided colors with authentic Japanese Kami and Washi paper packs.
KS
Reviewed by Kenji Sato & GapgiayOrigami Editorial Team✓ Test-Folded
Every diagram and folding step in this tutorial has been test-folded and verified for geometric accuracy.