

How to Make an Origami Cake: Easy Step-by-Step Paper Folding
Difficulty:
★★★★★
⏱5-10 mins
📄Specialized Origami Craft Paper

🎬Video Tutorial
📐Step-by-Step Diagram
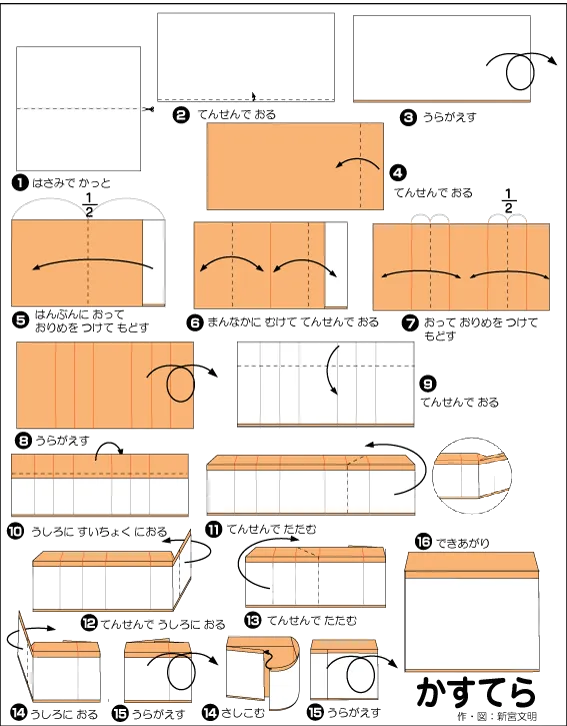
📝 Folding Steps
- Step 1: Cut the initial square paper in half horizontally to get a rectangle.
- Step 2: Fold the bottom edge of the paper up slightly along the dotted line.
- Step 3: Flip the paper over.
- Step 4: Fold the right edge inward, about half the width of the current section.
- Step 5: Fold the paper in half vertically from right to left, create a center crease, then unfold.
- Step 6: Fold both outer edges inward so they meet at the crease you just made (dividing each half).
- Step 7: Continue folding the new sections in half vertically to create more even creases.
- Step 8: Flip the paper over.
- Step 9: Fold the top edge of the paper down along the dotted line.
- Step 10: Pull and fold the top right corner backward along the dotted line to create a small diagonal crease.
- Step 11: Fold the entire top section down along the dotted line, flattening the crease.
- Step 12: Fold the left side edge backward along the dotted line.
- Step 13: Fold the top corner of the edge you just folded down along the dotted line.
- Step 14: Gently open the side edge and tuck the paper edge inward to form the box structure of the cake.
- Step 15: Flip the paper over and repeat steps 12-14 for the other side.
- Step 16: Complete! You now have a delicious origami cake!