


How to Make an Origami Sandwich: Easy Step-by-Step Guide
Difficulty:
★★★★★
⏱5-10 mins
📄Specialized Origami Craft Paper

🎬Video Tutorial
📐Step-by-Step Diagram
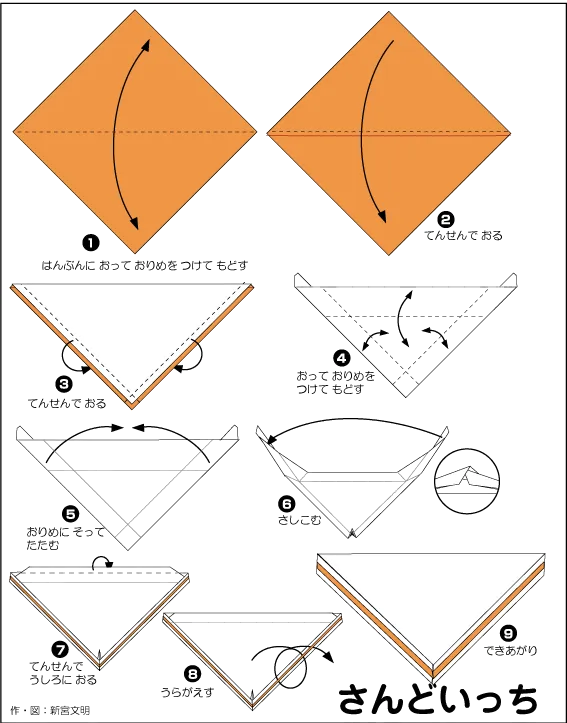
📝 Folding Steps
- Step 1: Start with a square sheet of paper, with the orange side facing up. (Figure 1 illustrates the paper and the first diagonal crease.)
- Step 2: Fold the paper in half diagonally, bringing the top corner down to meet the bottom corner to form a triangle. Make a sharp crease. (Figure 2 reinforces this folding action. After this step, the white side of the paper will be facing up, as shown in Figure 3.)
- Step 3: From the white triangle, slightly fold the two small bottom corners upwards and inwards, towards the center line of the triangle. (Make two small creases on both sides of the triangle's base.)
- Step 4: Continue by folding the two small corner sections from Step 3 once more. This time, fold their outer edges deeper towards the center line, making the corners thinner.
- Step 5: Flip the model over to the orange side. Then, fold the entire triangle in half again, from left to right, forming a smaller triangle.
- Step 6: Carefully open and gently flatten the top part of the small triangle you just folded. (This part will form the "crust" of the sandwich.)
- Step 7: Fold the two bottom left and right edges of the small triangle upwards, towards the center line. This will reveal more of the orange color, shaping the "bread slices."
- Step 8: Flip the entire model over to the other side.
- Step 9: Your origami "sandwich" model is complete!