


How to Make an Origami Long Box: Easy Step-by-Step Guide
Difficulty:
★★★★★
⏱5-10 mins
📄Kraft Paper or Cardstock (120-180gsm)

🎬Video Tutorial
📐Step-by-Step Diagram
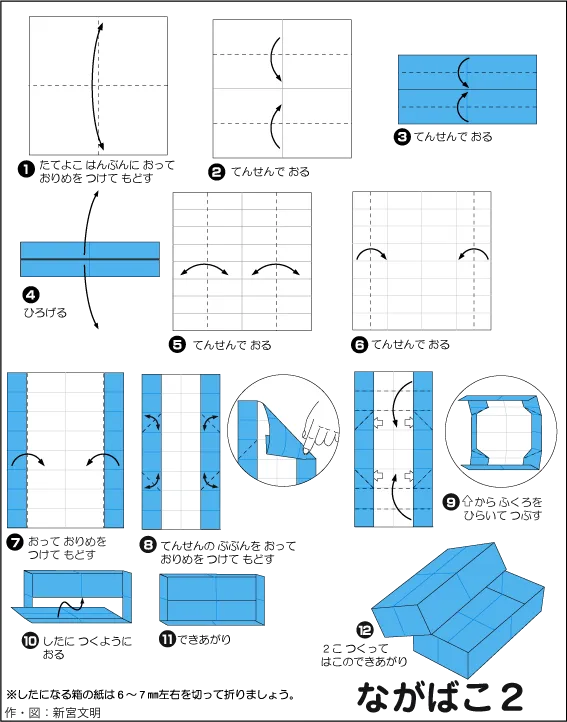
📝 Folding Steps
- Step 1: Fold the paper in half horizontally (top edge to bottom edge), then unfold to create a center crease.
- Step 2: Fold the top and bottom edges to the center, aligning them with the center crease.
- Step 3: Fold the top and bottom edges again toward the center line.
- Step 4: Unfold the entire paper to reveal all horizontal creases.
- Step 5: Fold the left and right edges inward to meet the marked vertical crease lines.
- Step 6: Fold the left and right edges inward once more.
- Step 7: Unfold the outer edges (the vertical folds made in step 6) to reveal the center section.
- Step 8: At the four corners of the colored strips on both sides, perform a squash fold to create small triangles.
- Step 9: Fold the outer edges (the colored strips) upward to form the box walls. The triangular corner folds will automatically stand up to lock the shape.
- Step 10: Smooth out and flatten the bottom of the box.
- Step 11: Your origami box is complete.
- Step 12: To make a box with a lid, repeat the process. (To ensure the lid fits perfectly over the base, use a piece of paper approximately 6-9mm smaller than the one used for the base.)
