


How to Make an Origami Banh Xeo: Easy Step-by-Step Paper Folding
Difficulty:
★★★★★
⏱5-10 mins
📄Specialized Origami Craft Paper

🎬Video Tutorial
📐Step-by-Step Diagram
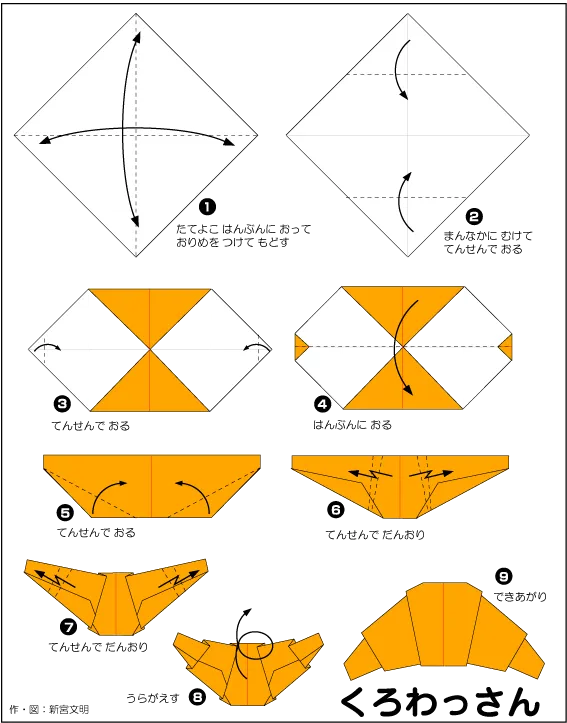
📝 Folding Steps
- Step 1: Start with a square sheet of paper. Fold the paper in half diagonally from one corner to the opposite, then unfold. Repeat with the other diagonal to create two X-shaped creases on the paper.
- Step 2: Fold the top edge of the paper down to meet the horizontal crease in the middle, then unfold. Next, fold the bottom edge of the paper up to meet the horizontal crease in the middle and unfold. (This creates additional horizontal creases).
- Step 3: Using the existing diagonal and horizontal creases, bring the side points of the paper inwards, collapsing the paper to form a square base. The outer corners should meet at the center line. You will have a diamond shape in the middle with two small triangular flaps at the top and bottom.
- Step 4: Fold the top triangular flap of the diamond shape downwards and the bottom triangular flap upwards, flattening them along the horizontal line to form a flat rectangle.
- Step 5: Fold the two top corners of the rectangle down towards the center line (horizontal crease) as shown.
- Step 6: At each corner folded in Step 5, perform an 'inside reverse fold' to create two small upward-pointing tips.
- Step 7: To create the croissant's layers, on each side, carefully pull out the paper from beneath the tip created in Step 6, flattening it outwards to form a wider, new layer, as indicated by the arrow.
- Step 8: Carefully roll or curve the middle part of the shape to create the natural curve of the croissant, giving the finished product a more dynamic look.
- Step 9: Your masterpiece is complete! You now have a beautiful paper croissant.