

How to Make an Origami Table: Easy Step-by-Step Guide
Difficulty:
★★★★★
⏱5-10 mins
📄Specialized Origami Craft Paper

🎬Video Tutorial
📐Step-by-Step Diagram
📌 Pin Diagram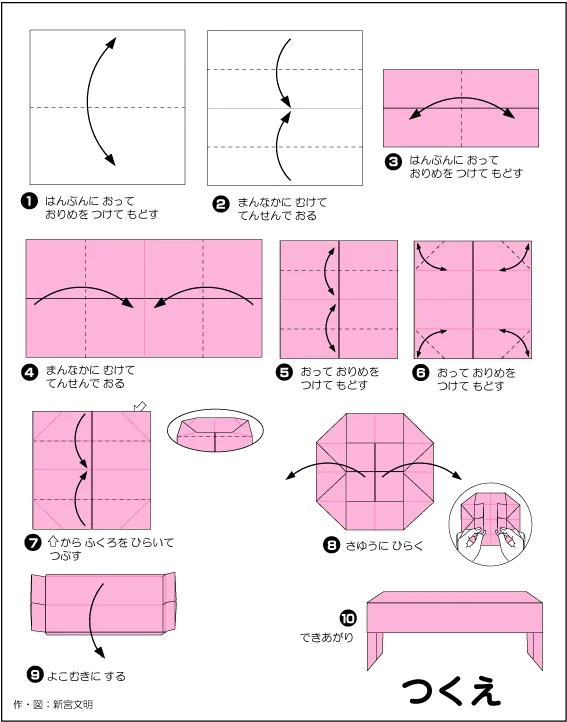
📝 Folding Steps
- Step 1: Prepare your paper. Use a square sheet of origami paper. Choose a color that suits your design. Place the colored side facing up before you begin.
- Step 2: Create base creases. Start by folding the paper in half diagonally or horizontally (depending on the diagram) to create a center crease, then unfold. Press firmly to ensure sharp, crisp creases.
- Step 3: Follow the diagram. Following the dashed lines on the diagram (valley folds and mountain folds), fold the corners and edges inward or backward accordingly. Ensure the edges are perfectly aligned.
- Step 4: Shape and finish. Adjust the final corners and edges, gently pulling out hidden folds to add volume or shape to your model. Give all creases a final firm press to complete your table.
Recommended Origami Supplies
🛒 Shop Origami Paper on AmazonAuthentic Japanese Kami & Washi Origami Paper
Get crisp, accurate creases and vibrant dual-sided colors with authentic Japanese Kami and Washi paper packs.
KS
Reviewed by Kenji Sato & GapgiayOrigami Editorial Team✓ Test-Folded
Every diagram and folding step in this tutorial has been test-folded and verified for geometric accuracy.